7 Ton Electric Log Splitter FAQ

The 7 ton log splitter is one of the most popular machines we stock, with thousands of customers relying on it for more than 17 years. The below FAQ is designed to help assist with anything which has come up over the years, in order to get you up and running as swiftly as possible.
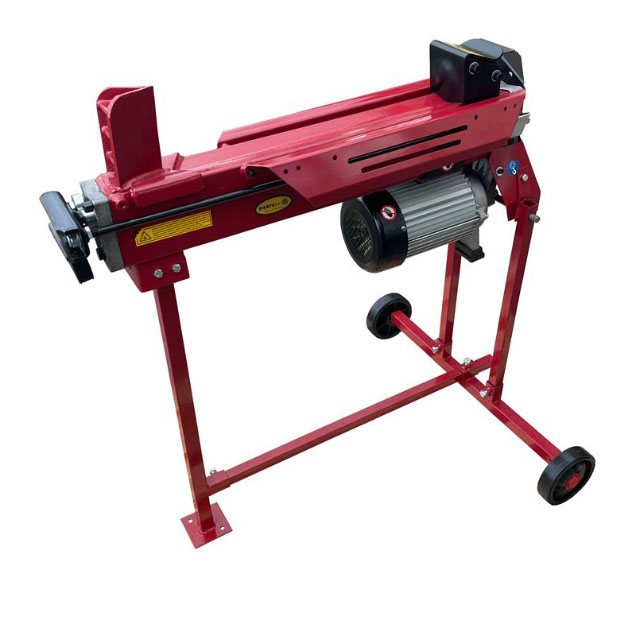
7 Ton Electric Log Splitter

Always ensure that your log splitter is disconnected from the mains before you follow any of the advice listed below.


General Questions

Yes - we stock plenty of spares for the 7 ton log splitter. Our full range of spares can be found here.

Our log splitter comes with a conventional UK 240v, 3-prong plug suitable for a standard UK domestic socket.


Assembly/Installation

You should have received a paper copy of the assembly instructions for the stand in the box alongside the machine after purchase. We do also have a video version of this showing the tools required and the steps to complete - you can view this by clicking here: https://youtu.be/4VMB7S59_8o

  • You can view a video showing the installation of the ram stop kit by clicking here: https://youtu.be/P536E178hDA
  • Alternatively, you can find written instructions below:
    • Tools/assistance required: 22mm socket, 22mm spanner, a second person to keep the lever in position
    • Pump the ram forward enough that you are able to gain access to the connecting rods. Use a second person to hold the lever on the back end of the machine to keep this in position.
    • Loosen the nuts on both sides of the back end of the handle using a 22mm socket, and remove these.
    • Move back the rods to separate this from the handle/cylinder.
    • Looking at the machine from the end you are currently working at (handle end, as opposed to the motor end), remove the nut and washer (using a 22mm spanner) on the left-hand side of the rod. Keep the right-hand side nut and washer in position for reference.
    • Place the ram stop onto the left-hand side of the rod and tighten this.
    • Replace the items in reverse order. Ensure when lining the rods up with the holes that the nuts/washers are level so they line up correctly when reassembling.
    • Replace the washer and tighten the nuts on both sides of the outside.

Yes, you can find further photos of this by clicking here: Titan Pro TPLS7T Electric Log Splitter – Safety Guard - Cage Assembled Photos

You will require an 8mm Allen key to remove the dipstick.


Operation

Yes! Our log splitter features a 2.2kW motor, we would suggest using a generator with a larger power rating than this however as the startup does draw more power. The minimum rating we would suggest would be a 3.6kW generator with a 240v supply as anything smaller may struggle to sustain constant running.

Yes! The unit is very easy to operate. As required by law our splitter features a two-handed design to move the ram. Simply hold the button on the motor and push the lever at the back down to start splitting!

The split cycle time is 19 seconds.

  • Yes, the bleed screw should always be left open when the log splitter is in use. You can close the bleed screw, however, when it is not in use.

  • Yes, we recommend tightening the bleed screw after use. Failure to do this can result in moisture entering the machine as it cools down.

If you want to split a log which has already been split, we recommend positioning the wood on the log splitter bark side down. If you are splitting logs which have branch stubs, try and place the stub pointing up if possible; avoid placing logs with the stubs facing down. This is to prevent damaging the log guides on the safety cage.

Unfortunately, none of our electric log splitters are suitable for towing.

  • We recommend wrapping your motor in a towel or something of that nature if it is to be stored for a lengthy period and putting a cover over the machine - this helps prevent condensation of the motor casing. Ideally, we would recommend storing your log splitter inside whenever possible.

  • This is very rare, but if this has happened it is from misuse of the machine. Please remember you must not press down forcefully on the operating lever. The operating lever controls the ram, so does not increase the splitting pressure. When the lever is pushed down with unnecessary force, it bends the handle causing a pressure build-up which will, over time, push the valve core out.  Please also remember not to leave the log splitter under continuous pressure when splitting for more than five seconds. If this does happen though, it can be solved: check you have all parts present, then insert them back into the machine. If the valve core is damaged or parts are missing, please contact us to purchase a new one.
  • You may also like to see our video, showing how to change the valve core, by clicking here: https://youtu.be/m3H5ADlxw7E


Power Issues

  • Ensure the bleed valve/screw is closed before moving the machine to avoid oil loss.
  • Turn the machine upside down.
  • Remove the two 16mm nuts securing the wheel axle section and the safety handle to the machine.
  • Remove the two 5mm Allen bolts on the sides of the axle section.
  • Be careful not to let the piston that the safety handle depresses come out as it's on a spring. If it does push it back in to avoid oil loss.
  • Now you will see the three 13mm bolts holding the motor, pump and casting to the chassis of the splitter.
  • Undo those three bolts, then there is another bolt holding the motor to the machine - undo that the motor and pump will come away from the machine.
  • Reverse these steps to reattach the new motor.

  • First, check the fuse in your plug. If blown replace with a 13-amp fuse. Check the RCD for the ring main has not tripped. If the RCD has tripped, try the log splitter on a separate ring main. If this does not resolve the problem, unplug all the other equipment from sockets on that ring main and switch these sockets off. Now try to start the motor. We always advise not using an extension lead when operating the log splitter and running it directly from a power supply.

  • Check the motor is turning freely and nothing is obstructing it.
  • Remove the black fan cover. You should be able to turn the fan with a small amount of pressure with one finger. If this is not the case, check for obstructions of the fan.
  • Check that the nut which tightens the lever is fully secure. Next, check that the face of the lever that operates the valve is bent at a 90-degree angle in relation to the mounting face. If this is not the case, remove the lever and adjust the lever to the correct angle in a vice.
  • Loosen all 6 bolts on the back of the pump by ¼ of a turn and check that the motor is turning freely.
  • Lastly, remove all 6 bolts from the pump and then separate the motor and pump. Check the gears for any silicone debris or other material. When reassembling, the torque for the bolts is 12 ft-lb, 16 N m.

  • Always make sure that you are using the correct fuse; a 13 amp fuse is needed for the log splitter.
  • 10 amp is insufficient and will blow the fuses.
  • We advise if you are using an extension lead, please make sure that it is specified for 3kw. We also recommend making sure it is fully unwound, as a wound extension reel will get excessively hot due to the coil effect and is likely to blow a fuse.
  • If using an extension lead do not use one greater than 20m in length, as any longer will build resistance and again blow a fuse, which may result in causing damage to the components in the splitter.
  • Test the splitter with it plugged into a mains wall socket if using an extension lead to eliminate that as a cause.
  • It is very unlikely the motor has seized as it’s an electric motor, but please take off the black round grill attached to the front of the motor and see if the white fan turns freely by hand.

A humming noise will typically result in the log splitter blowing a fuse and usually means that the motor is too tight. First, turn the log splitter over and close off the air vent, then remove the motor and pump 3 x 13mm headed bolts and 1 x support bolt. Then place the log splitter back upright and try the log splitter again, if the problem persists loosen the bolts a little from the end of the pump (3 x 13mm) and try again. If this does not solve the issue, then contact our technical team at techsupport@titan-pro.co.uk

  • This can be caused by a fault in the capacitor which reverses the polarity. If this occurs, you will need to replace the capacitor.


Ram

  • Make sure nothing is underneath the blade/pusher and down the sides of the carriage and make sure there are no splinters of wood preventing the ram from moving. Also, check the plastic spacers underneath the blade and underneath the carriage making sure nothing has come detached.
  • Check the log bed for any build-up of wood sap, if this does appear to be the case apply a thin layer of grease to the bed to allow the ram to move freely.
  • Use the ram stop to secure the ram in place about 150mm forward. Remove the 4 bolts holding the blade/pusher to the carriage and remove the blade/pusher. Unlock the Ramstop, if the carriage returns then the arms are bent. Check the amount of bend with a straight edge, if it is less than 5mm then we advise straightening them in a vice.
  • If the ram does not return after removing the blade untighten the 2 rear lock nuts on the carriage arms and remove the 2 nuts in front of the crosspiece. Remove the carriage from the log splitter. If the ram does not return, please contact our technical team on: techsupport@titan-pro.co.uk


Oil Leakage/Maintenance

  • Loosen the bleed screw by 3-4 turns before using the log splitter.
  • Make sure the bleed screw is tightened before moving the log splitter.
  • Make sure the Oil Drain Bolt with Dipstick is tightened.

  • To check the seals, you may first need to remove the stand to get to the pump casting - here are some instructions on how to complete the procedure after doing so:
    • Ensure the bleed valve/screw is closed prior to moving the machine to avoid oil loss.
    • Turn the machine upside down - that way you can see the three bolts holding the pump and casting to the base of the splitter.
    • Undo those three bolts, then there is another bolt holding the motor to the machine - undo that so the motor and pump come away from the machine.
    • Remove the six bolts holding the casting to the motor.
    • Remove the casting and check the seals.
  • Order replacement log splitter seals
  • Order replacement log splitter pump castings

Try to locate the oil leak. Clean the area and log splitter with white spirit then dry it. We advise patting around the area with a clean kitchen towel or rag which should then locate any spots of oil from the source of the leak. You may find operating the log splitter helps locate the source. After you have found the source please contact us at techsupport@titan-pro.co.uk


Failure to Split Logs

Please refer to the operating instructions section of the manual (page 13) to ensure you are loading the logs correctly.

Refer to the ‘sharpening wedge’ section (page 16) of the manual.

Turn the splitter upside down. Unfasten the 3 bolts which attach to the pump to the underside of the rear end plate. Check the oilways in the pump and the end plate for signs of any blockage. If no sign, contact us at techsupport@titan-pro.co.uk

Check the nut at the base of the lever to see if it is loose, if so, tighten the nut. The face of the lever should be bent at a 90-degree angle to the mounting face, if this is not the case, remove the lever and correct the bend using a vice then reattach.

  • Remove the dipstick and drain plug. Drain the log splitter of any old oil. Refill with fresh new oil so that it touches the dipstick, please note the dipstick must be fully screwed back in when checking the oil level.

  • Undo the bleed valve at the end of the machine and, without a log in place, operate the ram 20 times back and forth to its full extent.
  • Then try to split a log, making sure to firmly depress the operating lever. If all is okay, carry on splitting.
  • If the issues still exist, keep the bleed valve open and stand the machine with the valve uppermost for 24 hours to allow any air to exit the system.
  • Try to split a log again.

Try reducing the log sizes before splitting them with the log splitter.


Carriage Issues

  • Before checking the following, we always advise that you have the log splitter on a flat surface. If needed it can be on a slight uphill but never pointing downhill.
  • The operating valve is blocked or stuck.
    • Check that the end of the valve stem stays in contact with the face of the lever when the lever is depressed and released. If you find the valve does not pop back when the lever is released, then you will need to clean it. Before removing anything please ensure the ram is fully returned to prevent any damage to the ram. Then remove the nut which is holding the lever and then remove the lever and valve. Check the o-ring and gently clean the valve with a lint-free cloth. Replace the valve and the lever.
    • The operating sleeve is incorrectly aligned.
    • Remove the valve as mentioned above. Loosen the grub screw in the angled hole below the valve sleeve then use a punch to tap back in the sleeve and tighten back up the grub screw.

Secure online payments with

Your Payment Options